

Overview
“Life is like a landscape. You live in the midst of it but can describe it only from the vantage point of distance…”
Charles Lindberg
Landscapes. As far as the eye can see. Visually stunning and inspiring, game engines are getting better at recreating these awesome environments.
This multi-part tutorial will focus on the basics of creating landscapes in UDK. These basics can be applied to any game engine, but some features/techniques may differ.
Essentially there are 3 main parts in creating landscapes:
– Elevation
– Textures
– Foliage
Elevation in game development terms would be considered as a Heightmap. A heightmap controls the elevation of the landscape through a grayscale texture. The grayscale texture can either be created in an photo-editing program such as Photoshop, or can be painted by hand in the game engine. In this tutorial I will show you how to do both!
Heightmap

In a grayscale image, the computer reads the information as values between 0 and 1. 0 refers to black and 1 refers to white. 0.5 would be a perfect grey. The black areas will be the lowest points of elevation while white areas will be the highest. Depending on the size of your heightmap, the landscape size will need to be adjusted.
Before we jump in too deep in creating heightmaps, go ahead and take a look at the landscapes page on the Unreal Development Network. Here you will find the landscape dimensions and other tips for getting started. Click the link below.
Look for the section that has this chart.
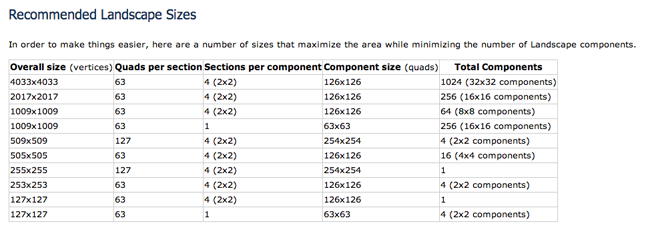
The overall size is determined in the far left column. Landscape in UDK is broken up into vertices, which should sound familiar if you have ever used a 3d program. The landscape is also split into areas called quads. This chart shows the recommended sizes for your landscape and the number of quads per section.
On the left side of the screen you will see an icon that looks like this. Click it to enter landscape mode.

A window will then popup that looks like this.

This window will allow you to either import a heightmap you already created, or create a new landscape from scratch. In the second section of the window you can input values for the size of your heightmap.

Refer back to the chart for landscape sizes and input those values.

Now click Create Landscape.

Your landscape is now ready for sculpting!
Painting Heightmap in UDK
These next videos will show you the landscape mode tool and all the sculpting an painting tools that are available to you. You might have to turn up the volume a bit.
Before you start sculpting your own landscapes, pull up Google and search for some reference images. Use environment types as keywords such as forest, plains, desert, tundra, glacier, etc. There are tons of pictures on the internet of landscapes so you should have no problems finding something you like.


Think about how your landscape was formed and changed over time. Was there a great flood? Nuclear fallout? Excavated by humans? Everything has a story of how it came to be. Tell a story with your landscape, and let the player/audience discover all of its secrets.
Now that you know what tools are available to you, you can start sculpting your own landscape.
Stay tuned for Part II: Textures
